
Structured Light 3D Scanner
Encyclopedia
3D scanner
A 3D scanner is a device that analyzes a real-world object or environment to collect data on its shape and possibly its appearance . The collected data can then be used to construct digital, three dimensional models....
is a device for measuring the three-dimensional shape of an object using projected light patterns
Structured light
]Structured light is the process of projecting a known pattern of pixels on to a scene. The way that these deform when striking surfaces allows vision systems to calculate the depth and surface information of the objects in the scene, as used in structured light 3D scanners.Invisible Structured...
and a camera
Camera
A camera is a device that records and stores images. These images may be still photographs or moving images such as videos or movies. The term camera comes from the camera obscura , an early mechanism for projecting images...
system.
Principle
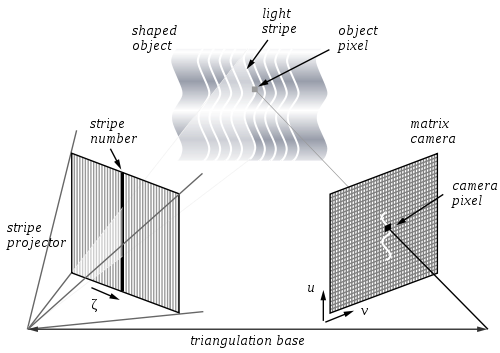
Projecting a narrow band of light onto a three-dimensionally shaped surface produces a line of illumination that appears distorted from other perspectives than that of the projector, and can be used for an exact geometric reconstruction of the surface shape (light section).A faster and more versatile method is the projection of patterns consisting of many stripes at once, or of arbitrary fringes, as this allows for the acquisition of a multitude of samples simultaneously.
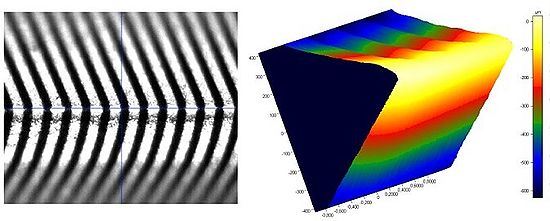
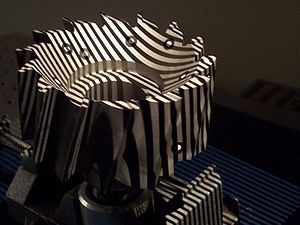
Seen from different viewpoints, the pattern appears geometrically distorted due to the surface shape of the object.
Although many other variants of structured light
Structured light
]Structured light is the process of projecting a known pattern of pixels on to a scene. The way that these deform when striking surfaces allows vision systems to calculate the depth and surface information of the objects in the scene, as used in structured light 3D scanners.Invisible Structured...
projection are possible, patterns of parallel stripes are widely used. The picture shows the geometrical deformation of a single stripe projected onto a simple 3D surface. The displacement of the stripes allows for an exact retrieval of the 3D coordinates of any details on the object's surface.
Generation of stripe patterns
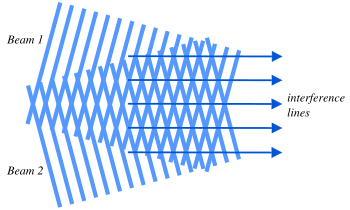
The laser interference method works with two wide planar laser
Laser
A laser is a device that emits light through a process of optical amplification based on the stimulated emission of photons. The term "laser" originated as an acronym for Light Amplification by Stimulated Emission of Radiation...
beam fronts. Their interference results in regular, equidistant line patterns. Different pattern sizes can be obtained by changing the angle between these beams. The method allows for the exact and easy generation of very fine patterns with unlimited depth of field. Disadvantages are high cost of implementation, difficulties providing the ideal beam geometry, and laser typical effects like speckle noise
Speckle pattern
A speckle pattern is a random intensity pattern produced by the mutual interference of a set of wavefronts. This phenomenon has been investigated by scientists since the time of Newton, but speckles have come into prominence since the invention of the laser and have now found a variety of...
and the possible self interference with beam parts reflected from objects. Also typically there is no means of modulating individual stripes, e.g. with Gray codes (see below).
Video projector
A video projector is an image projector that receives a video signal and projects the corresponding image on a projection screen using a lens system. All video projectors use a very bright light to project the image, and most modern ones can correct any curves, blurriness, and other...
. Patterns are generated by a display within the projector, typically an LCD (liquid crystal) or LCOS (liquid crystal on silicon) display.
A proprietary projection method uses DLP (moving micro mirror) displays. DLP displays do not absorb light significantly and therefore allow very high light intensities. They also have an extremely linear gray value reproduction, as they are steered by pulse length modulation.
Principally, stripes generated by display projectors have small discontinuities due to the pixel
Pixel
In digital imaging, a pixel, or pel, is a single point in a raster image, or the smallest addressable screen element in a display device; it is the smallest unit of picture that can be represented or controlled....
boundaries in the displays. Sufficiently small boundaries however can practically be neglected as they are evened out by the slightest defocus.
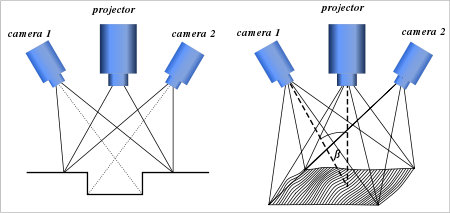
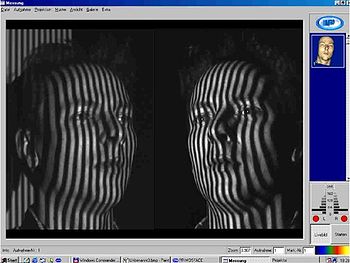
A typical measuring assembly consists of one stripe projector and at least one camera. For many applications, two cameras on opposite sides of the projector have been established as useful.
Invisible (or Imperceptible) Structured Light is a technique to utilize structured light without interfering with other computer vision tasks for which the projected pattern will be confusing. Example methods include the use of infrared light or of extremely high framerates alternating between two exact opposite patterns.
Calibration
Calibration
Calibration is a comparison between measurements – one of known magnitude or correctness made or set with one device and another measurement made in as similar a way as possible with a second device....
of the measuring equipment, using special calibration patterns and surfaces. A mathematical model is used to describe the imaging properties of projector and cameras. Essentially based on the simple geometric properties of a
pinhole camera
Pinhole camera
A pinhole camera is a simple camera without a lens and with a single small aperture – effectively a light-proof box with a small hole in one side. Light from a scene passes through this single point and projects an inverted image on the opposite side of the box...
, the model also has to take into account the geometric distortions and optical aberration
Aberration in optical systems
Aberrations are departures of the performance of an optical system from the predictions of paraxial optics. Aberration leads to blurring of the image produced by an image-forming optical system. It occurs when light from one point of an object after transmission through the system does not converge...
of projector and camera lenses. The parameters of the camera as well as its orientation in space can be determined by a series of calibration measurements, using photogrammetric
Photogrammetry
Photogrammetry is the practice of determining the geometric properties of objects from photographic images. Photogrammetry is as old as modern photography and can be dated to the mid-nineteenth century....
bundle adjustment
Bundle adjustment
Given a set of images depicting a number of 3D points from different viewpoints, bundle adjustment can be defined as the problem of simultaneously refining the 3D coordinates describing the scene geometry as well as the parameters of the relative motion and the optical characteristics of the camera...
.
Analysis of stripe patterns
Gray code
The reflected binary code, also known as Gray code after Frank Gray, is a binary numeral system where two successive values differ in only one bit. It is a non-weighted code....
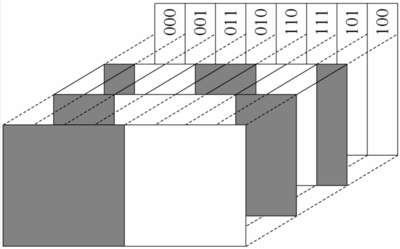
sequences identifying the number of each individual stripe hitting the object.
An important depth cue also results from the varying stripe widths along the object surface. Stripe width is a function of the steepness of a surface part, i.e. the first derivative
Derivative
In calculus, a branch of mathematics, the derivative is a measure of how a function changes as its input changes. Loosely speaking, a derivative can be thought of as how much one quantity is changing in response to changes in some other quantity; for example, the derivative of the position of a...
of the elevation. Stripe frequency and phase deliver similar cues and can be analyzed by a Fourier transform
Fourier transform
In mathematics, Fourier analysis is a subject area which grew from the study of Fourier series. The subject began with the study of the way general functions may be represented by sums of simpler trigonometric functions...
. Finally, the wavelet transform
Wavelet
A wavelet is a wave-like oscillation with an amplitude that starts out at zero, increases, and then decreases back to zero. It can typically be visualized as a "brief oscillation" like one might see recorded by a seismograph or heart monitor. Generally, wavelets are purposefully crafted to have...
has recently been discussed for the same purpose.
In many practical implementations, series of measurements combining pattern recognition, Gray codes and Fourier transform are obtained for a complete and unambiguous reconstruction of shapes.
Another method also belonging to the area of fringe projection has been demonstrated, utilizing the depth of field of the camera ((Univ. of Stuttgart)).
It is also possible to use projected patterns primarily as a means of structure insertion into scenes, for an essentially photogrammetric
Photogrammetry
Photogrammetry is the practice of determining the geometric properties of objects from photographic images. Photogrammetry is as old as modern photography and can be dated to the mid-nineteenth century....
acquisition.
Precision and range
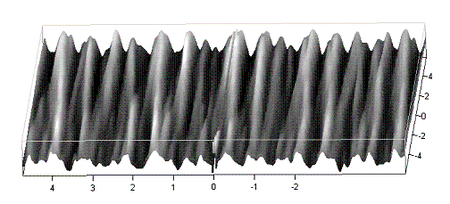

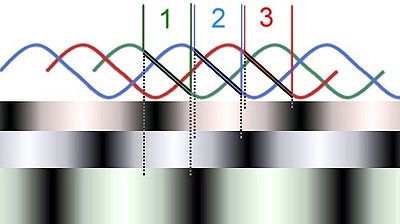
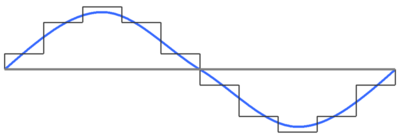
An extreme reduction of stripe width proves inefficient due to limitations in depth of field, camera resolution and display resolution. Therefore the phase shift method has been widely established: A number of at least 3, typically about 10 exposures are taken with slightly shifted stripes. The first theoretical deductions of this method relied on stripes with a sine wave shaped intensity modulation, but the methods works with "rectangular" modulated stripes, as delivered from LCD or DLP displays as well.
By phase shifting, surface detail of e.g. 1/10 the stripe pitch can be resolved.
Current optical stripe pattern profilometry hence allows for detail resolutions down to the wavelength of light, below 1 micrometer in practice or, with larger stripe patterns, to approx. 1/10 of the stripe width. Concerning level accuracy, interpolating over several pixels of the acquired camera image can yield a reliable height resolution and also accuracy, down to 1/50 pixel.
Arbitrarily large objects can be measured with accordingly large stripe patterns and setups. Practical applications are documented involving objects several meters in size.
Typical accuracy figures are:
- Planarity of a 2ft. (60 cm) wide surface, to 10 μm.
- Shape of a motor combustion chamberCombustion chamberA combustion chamber is the part of an engine in which fuel is burned.-Internal combustion engine:The hot gases produced by the combustion occupy a far greater volume than the original fuel, thus creating an increase in pressure within the limited volume of the chamber...
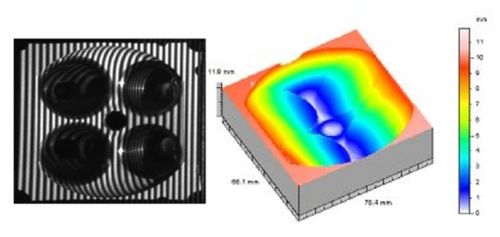
to 2 μm (elevation), yielding a volume accuracy 10 times better than with volumetric dosing. - Shape of an object 2" large, to about 1 μm
- Radius of a blade edge of e.g. 10 μm, to ±0.4 μm
Navigation
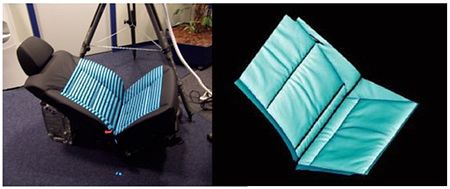
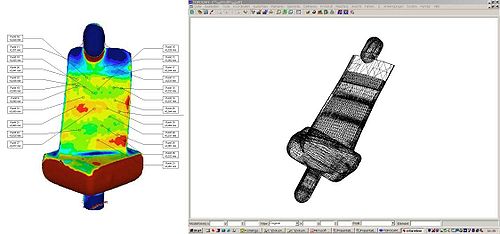
The 3D data gathered can be used to retrieve CAD (computer aided design) data and models from existing components (reverse engineering
Reverse engineering
Reverse engineering is the process of discovering the technological principles of a device, object, or system through analysis of its structure, function, and operation...
), hand formed samples or sculptures, natural objects or artifacts.
Limitations
As with all optical methods, reflective or transparent surfaces raise difficulties. Reflections cause light to be reflected either away from the camera or right into its optics. In both cases, the dynamic range of the camera can be exceeded. Transparent or semi-transparent surfaces also cause major difficulties. In these cases, coating the surfaces with a thin opaque lacquer just for measuring purposes is a common practice. For measuring entirely reflective surfaces, the alternative method of fringe reflection has been implemented. Alternative optical techniques have been proposed for handling perfectly transparent and specular objects .Double reflections and inter-reflections can cause the stripe pattern to be overlaid with unwanted light, entirely eliminating the chance for proper detection. Reflective cavities and concave objects are therefore difficult to handle. It is also hard to handle translucent materials, such as skin, marble, wax, plants and human tissue because of the phenomenon of sub-surface scattering. Recently, there has been an effort in the computer vision community to handle such optically complex scenes by re-designing the illumination patterns . These methods have shown promising 3D scanning results for traditionally difficult objects, such as highly specular metal concavities and translucent wax candles .
Speed
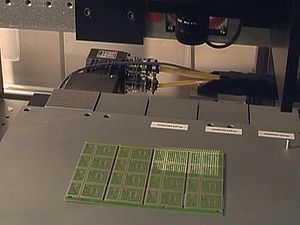
- Inline precision inspection of components during the production process.
- Health care applications, such as live measuring of human body shapes or the micro structures of human skin.
Motion picture applications have been proposed, for example the acquisition of spatial scene data for three-dimensional television.
Applications
- The Kinect-Camera from MicrosoftMicrosoftMicrosoft Corporation is an American public multinational corporation headquartered in Redmond, Washington, USA that develops, manufactures, licenses, and supports a wide range of products and services predominantly related to computing through its various product divisions...
is the first consumer-grade application. It uses a pattern of projected infrared-Points to generate a dense 3D-Image. - Made to measureMade to measureMade to measure typically refers to clothing that is sewn from a standard-sized base pattern. A tailored suit is a common example of a made-to-measure garment...
fashion retailing - Precision shape measurement for production control (e.g. turbine blades)
- Reverse engineering (obtaining precision CAD data from existing objects)
- Volume measurement (e.g. combustion chamber volume in motors)
- Classification of grinding materials and tools
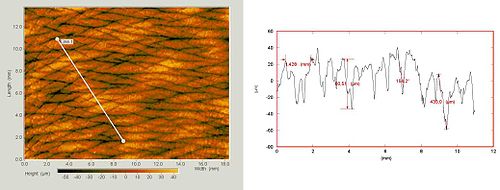
- Precision structure measurement of grinded surfaces
- Radius determination of cutting tool blades
- Precision measurement of planarity
- Documenting objects of cultural heritage
- Skin surface measurement for cosmetics and medicine
- Body shape measurement
- Forensic science inspections
- Road pavement structure and roughness
- Wrinkle measurement on cloth and leather
- Measurement of topography of solar cells (see reference W J Walecki, et al. 2008)
Books
- Fringe 2005, The 5th International Workshop on Automatic Processing of Fringe Patterns Berlin: Springer, 2006. ISBN 3-540-26037-4 ISBN 978-3-540-26037-0
