Isometric projection
Overview
Technical drawing
Technical drawing, also known as drafting or draughting, is the act and discipline of composing plans that visually communicate how something functions or has to be constructed.Drafting is the language of industry....
and engineering drawing
Engineering drawing
An engineering drawing, a type of technical drawing, is used to fully and clearly define requirements for engineered items.Engineering drawing produces engineering drawings . More than just the drawing of pictures, it is also a language—a graphical language that communicates ideas and information...
s. It is an axonometric projection
Axonometric projection
Axonometric projection is a type of parallel projection, more specifically a type of orthographic projection, used to create a pictorial drawing of an object, where the object is rotated along one or more of its axes relative to the plane of projection....
in which the three coordinate axes
Cartesian coordinate system
A Cartesian coordinate system specifies each point uniquely in a plane by a pair of numerical coordinates, which are the signed distances from the point to two fixed perpendicular directed lines, measured in the same unit of length...
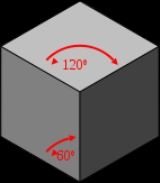
appear equally foreshortened and the angles between any two of them are 120 degrees.
The term "isometric" comes from the Greek
Greek language
Greek is an independent branch of the Indo-European family of languages. Native to the southern Balkans, it has the longest documented history of any Indo-European language, spanning 34 centuries of written records. Its writing system has been the Greek alphabet for the majority of its history;...
for "equal measure", reflecting that the scale along each axis of the projection is the same (unlike some other forms of graphical projection
Graphical projection
Graphical projection is a protocol by which an image of a three-dimensional object is projected onto a planar surface without the aid of mathematical calculation, used in technical drawing.- Overview :...
).
An isometric view of an object can be obtained by choosing the viewing direction in a way that the angles between the projection of the x, y, and z axes are all the same, or 120°.

