

First Battle of Passchendaele
Encyclopedia
The First Battle of Passchendaele was a World War I
battle that took place on 12 October 1917 in the Ypres Salient
area of the Western Front
, outside the Belgian village of Passchendaele
, during the Third Battle of Ypres. The Allied attack failed to capture and hold the German-held high ground along the Passchendaele-Westrozebeke ridge and resulted in significant Allied and German casualties.
Douglas Haig
launched an offensive, the Third Battle of Ypres, in an attempt to break out of the Ypres Salient
. At the Battle of Messines Ridge the far side of the ridge had been captured up to the Oosttaverne Line and a substantial success gained in the subsequent Battle of Pilckem Ridge. At the Battle of Langemarck there was a solid gain around Langemarck village as XIV Corps advanced 1,500 yards. On the Gheluvelt Plateau one Brigade managed an advance of 400 yards but this result left the Fifth army in a bigger salient in the north. In view of the failure of the British Fifth Army to advance far in August, despite several attempts to gain ground on the Gheluvelt Plateau, Haig decided to transfer the weight of the offensive towards to the south-east along the higher ground of the Gheluvelt Plateau, Broodseinde Ridge and the southern half of Passchendaele Ridge. Despite the difficulties the British encountered, considerable strain had been put on the German defence Generalleutnant
Hermann von Kuhl, Chief of Staff of Army Group Rupprecht, later claimed that conditions were much worse for the Germans and that sickness took a heavy toll.
The main offensive was switched to the British Second Army under command of General Herbert Plumer
. Plumer refined the tactics of bite-and-hold used on 31 July and in August. Given the German system of deploying in shell holes in depth rather than along lines of trenches and with a counter-attacking reserve nearby, the further than the British infantry advanced, the more opposition they met as they became more disorganized and weakened by losses. Instead of attacking with more troops against the first objective, the array was to be reversed so that the number of troops allotted to the final objective would be greater than the first, ensuring that there would be enough to withstand the German counter-attack. To advance quickly to the first objective the troops detailed were to be lightly equipped. Each unit was to keep a portion in reserve so as to maintain momentum when delays were encountered. By a succession of attacks with objectives of diminishing distance and increasing numbers of infantry behind a bigger multi-layered creeping barrage and with standing barrages on the objective lines during consolidation, German counter-attacks would be confronted by an organized infantry defence in depth, in communication with its artillery and with much more local support from the Royal Flying Corps, rather than the former practice of looking to capitalize on success by occupying vacant ground opportunistically. Limited advances like this at the Battle of the Menin Road Ridge, Battle of Polygon Wood
and the Battle of Broodseinde
produced a 4000 yards (3,657.6 m) advance in two weeks, heavy German casualties and a search by the German high command for a remedy to the refined British attacking methods.
 In the lower ground west of the Passchendaele Ridge, three months of constant shelling had blocked the watercourses that normally provided drainage. When rain began falling on the night of 4 October—which continued intermittently for the next three days—much of the battlefield was once again transformed into a quagmire of mud, making movement extremely difficult. According to the Official Historian, Gough and Plumer have told Haig that they favoured ending the campaign on account of the change in the weather and general state of the battlefield, at a meeting on 7 October but this doesn't appear in contemporary records. The decision was made to continue the offensive in order to gain more favourable winter positions on higher ground, to assist the French with their attack due at Malmaison on 23 October and to hold German troops in Flanders during the preparations of the offensive at Cambrai.
Encouraged by the scale of German casualties during the Battle of Broodseinde
and reports of lowered German morale, Haig sought to quickly to renew the Allied offensive and secure Passchendaele Ridge. The wet weather, increased German artillery fire on approach routes and numerous spoiling attacks made the movement extremely difficult, significantly compromising battle preparations. Nonetheless the Battle of Poelcappelle
went forward on 9 October and proved to be a failure with the Allies suffering significant casualties and failing to hold much of the ground captured. German losses were also heavy.
Plumer had not known of the real state of the battlefield when the plan was decidedon the evening of 9 October. When 3rd Australian and the New Zealand divisions entered the front line on the night of 10 – 11 October they quickly discovery that the Allies were not holding the front reported, a condition on which the barrage plan was based. It was not until 11 October that Plumer found that the line held was practically the same as that before the Battle of Poelcappelle
and that the main reason for the failure on 9 October was two belts of wire thirty yards deep, in front of the pill-boxes on Wallemolen spur. It was considered too late to try to alter the barrage plans and orders for the whole front. The 3rd Australian Division, which was to capture Passchendaele village, was forced to quicken its rate of advance so that it would catch up the general line of the creeping bombardment.
The Germans had not been idle after their costly defensive success on 9 October. Reliefs had taken place and in some parts of the front areas 1,000m wide had 17 heavy machine-guns and large numbers of Maxim MG 08/15 machine guns distributed among the infantry companies. The tempo of British operations was causing considerable anxiety among German commanders.
The first and second objectives were those intended for the morning and the final objective was much the same as that intended for the afternoon of 9 October. 3rd Australian Division was to advance just beyond Passchendaele with its left to the north of Goudberg and the New Zealand Division was to capture the Wallemolen spur. On the New Zealand front the creeping barrage was very thin and diminished as it moved forward, with howitzer shells burying themselves in the wet ground and exploding harmlessly. The infantry tried to cut their way through the uncut wire on the spur and had heavy losses (2,735 casualties) to German machine-gun fire. The same fire stopped the left of 3rd Australian Division at the first objective south of the Ravebeek. On the right it reached the second objective and a patrol got into Passchendaele, finding it empty. At 10.50 a.m. the Australian reserve battalion was sent towards the west of the village to combine with another New Zealand attack at 3.00 p.m. Before this could be done the Australians withdrew slowly in the face of the machine-gun fire from the Bellevue pill-boxes, sniping and artillery fire so the attempt was cancelled. On the right the 12th Brigade, 4th Australian Division got across the Keiberg spur but withdrew with the 3rd Australian Division.
Flank protection for the main attack by 9th and 18th divisions XVIII Corps, Fifth Army, attacking north of Goudberg and north of the Lekkerboterbeek, broke down amidst ineffectual artillery fire, mud and machine-gun fire from drier undamaged German positions in front of Flandern I. XIV Corps on the left managed to advance closer to Houthoulst forest under much better artillery and machine-gun covering fire. 4th Division was held on the right near Poelcappelle but on the left advanced 700 yards to the final objective. 17th Division captured most of its final objective astride the Ypres – Staden railway and the Guards Division all of its objectives by crossing the Vijwegen spur and closing up to Houthoulst forest.
having begun preparations for a withdrawal on 7 October.
The weaker artillery support and increase in mud had made it much easier for the defenders to separate British infantry from their creeping bombardments and hardly any counter-battery fire was achieved between 9 and 12 October. On 13 October it was decided to stop attacks until better weather allowed roads and tracks behind the British front to be repaired so that artillery support could return to the levels of September.
The British assault failed to achieve any of its ground objectives and resulted in significant Allied and German casualties. The German 195th Division, guarding the approaches to Passchendaele had such heavy losses that it had to be relieved. The only benefit apart from the casualties inflicted on the Germans was that the marginal territorial gain did provide a slightly better starting line for the Second Battle of Passchendaele. The Canadian Corps relieved the II Anzac Corps
on 18 October from its position along the valley between Gravenstafel Ridge and the heights at Passchendaele. After a period of preparation, the Canadian Corps continued the Allied advance, ultimately capturing Passchendaele on 6 November.
Two Victoria Crosses, the highest military decoration for valour awarded to British and Commonwealth
forces, were awarded for actions during the battle:
The New Zealand Memorial to the Missing at Tyne Cot commemorates New Zealanders who were killed during the Battle of Broodseinde and the First Battle of Passchendaele and whose final resting place is unknown.
World War I
World War I , which was predominantly called the World War or the Great War from its occurrence until 1939, and the First World War or World War I thereafter, was a major war centred in Europe that began on 28 July 1914 and lasted until 11 November 1918...
battle that took place on 12 October 1917 in the Ypres Salient
Ypres Salient
The Ypres Salient is the area around Ypres in Belgium which was the scene of some of the biggest battles in World War I.In military terms, a salient is a battlefield feature that projects into enemy territory. Therefore, the salient is surrounded by the enemy on three sides, making the troops...
area of the Western Front
Western Front (World War I)
Following the outbreak of World War I in 1914, the German Army opened the Western Front by first invading Luxembourg and Belgium, then gaining military control of important industrial regions in France. The tide of the advance was dramatically turned with the Battle of the Marne...
, outside the Belgian village of Passchendaele
Passendale
Passendale or Passchendaele is a rural Belgian village in the Zonnebeke municipality of West Flanders province...
, during the Third Battle of Ypres. The Allied attack failed to capture and hold the German-held high ground along the Passchendaele-Westrozebeke ridge and resulted in significant Allied and German casualties.
Background
In July 1917, British Field MarshalField Marshal
Field Marshal is a military rank. Traditionally, it is the highest military rank in an army.-Etymology:The origin of the rank of field marshal dates to the early Middle Ages, originally meaning the keeper of the king's horses , from the time of the early Frankish kings.-Usage and hierarchical...
Douglas Haig
Douglas Haig
Douglas Haig, 1st Earl Haig was a British soldier and senior commander during World War I.Douglas Haig may also refer to:* Club Atlético Douglas Haig, a football club from Argentina* Douglas Haig , American actor...
launched an offensive, the Third Battle of Ypres, in an attempt to break out of the Ypres Salient
Ypres Salient
The Ypres Salient is the area around Ypres in Belgium which was the scene of some of the biggest battles in World War I.In military terms, a salient is a battlefield feature that projects into enemy territory. Therefore, the salient is surrounded by the enemy on three sides, making the troops...
. At the Battle of Messines Ridge the far side of the ridge had been captured up to the Oosttaverne Line and a substantial success gained in the subsequent Battle of Pilckem Ridge. At the Battle of Langemarck there was a solid gain around Langemarck village as XIV Corps advanced 1,500 yards. On the Gheluvelt Plateau one Brigade managed an advance of 400 yards but this result left the Fifth army in a bigger salient in the north. In view of the failure of the British Fifth Army to advance far in August, despite several attempts to gain ground on the Gheluvelt Plateau, Haig decided to transfer the weight of the offensive towards to the south-east along the higher ground of the Gheluvelt Plateau, Broodseinde Ridge and the southern half of Passchendaele Ridge. Despite the difficulties the British encountered, considerable strain had been put on the German defence Generalleutnant
General (Germany)
General is presently the highest rank of the German Army and Luftwaffe . It is the equivalent to the rank of Admiral in the German Navy .-Early history:...
Hermann von Kuhl, Chief of Staff of Army Group Rupprecht, later claimed that conditions were much worse for the Germans and that sickness took a heavy toll.
The main offensive was switched to the British Second Army under command of General Herbert Plumer
Herbert Plumer, 1st Viscount Plumer
Field Marshal Herbert Charles Onslow Plumer, 1st Viscount Plumer, GCB, GCMG, GCVO, GBE was a British colonial official and soldier born in Torquay who commanded the British Second Army in World War I and later served as High Commissioner of the British Mandate for Palestine.-Military...
. Plumer refined the tactics of bite-and-hold used on 31 July and in August. Given the German system of deploying in shell holes in depth rather than along lines of trenches and with a counter-attacking reserve nearby, the further than the British infantry advanced, the more opposition they met as they became more disorganized and weakened by losses. Instead of attacking with more troops against the first objective, the array was to be reversed so that the number of troops allotted to the final objective would be greater than the first, ensuring that there would be enough to withstand the German counter-attack. To advance quickly to the first objective the troops detailed were to be lightly equipped. Each unit was to keep a portion in reserve so as to maintain momentum when delays were encountered. By a succession of attacks with objectives of diminishing distance and increasing numbers of infantry behind a bigger multi-layered creeping barrage and with standing barrages on the objective lines during consolidation, German counter-attacks would be confronted by an organized infantry defence in depth, in communication with its artillery and with much more local support from the Royal Flying Corps, rather than the former practice of looking to capitalize on success by occupying vacant ground opportunistically. Limited advances like this at the Battle of the Menin Road Ridge, Battle of Polygon Wood
Battle of Polygon Wood
The Battle of Polygon Wood took place during the second phase of the Battle of Passchendaele in World War I. The battle was fought near Ypres, Belgium, in an area named the Polygon Wood after the layout of the area...
and the Battle of Broodseinde
Battle of Broodseinde
The Battle of Broodseinde was the most successful attack of the Battle of Passchendaele. Using the "bite and hold" tactic , the Allied forces conducted an attack on well-entrenched German forces and showed that it was possible for the allies to overcome even the stoutest German...
produced a 4000 yards (3,657.6 m) advance in two weeks, heavy German casualties and a search by the German high command for a remedy to the refined British attacking methods.
Encouraged by the scale of German casualties during the Battle of Broodseinde
Battle of Broodseinde
The Battle of Broodseinde was the most successful attack of the Battle of Passchendaele. Using the "bite and hold" tactic , the Allied forces conducted an attack on well-entrenched German forces and showed that it was possible for the allies to overcome even the stoutest German...
and reports of lowered German morale, Haig sought to quickly to renew the Allied offensive and secure Passchendaele Ridge. The wet weather, increased German artillery fire on approach routes and numerous spoiling attacks made the movement extremely difficult, significantly compromising battle preparations. Nonetheless the Battle of Poelcappelle
Battle of Poelcappelle
The Battle of Poelcappelle marked the end of highly successful British attacks during the Battle of Passchendaele. Pitting the attacking forces against relatively intact German defences in rain and muddy conditions like those in August, the main attack was a failure and only the diversionary attack...
went forward on 9 October and proved to be a failure with the Allies suffering significant casualties and failing to hold much of the ground captured. German losses were also heavy.
Prelude
The object of the main attack was to reach the final objective intended for the afternoon advance that had been given for II ANZAC Corps on 9 October on the far side of Passchendaele village. The assault would be another joint effort of the British Second and Fifth Armies. To achieve this aim, the British Second Army would strengthen its hold on the Passchendaele ridge by capturing Passchendaele village and the Goudberg Spur to the north. Since the British Fifth Army was short of fresh troops, it could not undertake extensive operations in support of the attack and limited its participation to protecting the flank of the Second Army. The main portion of the attack on the Second Army front would be carried out by II Anzac Corps, with their northern flank safeguarded by XVIII Corps and the southern flank by I Anzac Corps. The plan of attack allotted the capture of Passchendaele village to the 3rd Australian Division and that of the Goudberg Spur to the New Zealand Division. The planned depth of advance was between 2000 and 2500 yards.Plumer had not known of the real state of the battlefield when the plan was decidedon the evening of 9 October. When 3rd Australian and the New Zealand divisions entered the front line on the night of 10 – 11 October they quickly discovery that the Allies were not holding the front reported, a condition on which the barrage plan was based. It was not until 11 October that Plumer found that the line held was practically the same as that before the Battle of Poelcappelle
Battle of Poelcappelle
The Battle of Poelcappelle marked the end of highly successful British attacks during the Battle of Passchendaele. Pitting the attacking forces against relatively intact German defences in rain and muddy conditions like those in August, the main attack was a failure and only the diversionary attack...
and that the main reason for the failure on 9 October was two belts of wire thirty yards deep, in front of the pill-boxes on Wallemolen spur. It was considered too late to try to alter the barrage plans and orders for the whole front. The 3rd Australian Division, which was to capture Passchendaele village, was forced to quicken its rate of advance so that it would catch up the general line of the creeping bombardment.
The Germans had not been idle after their costly defensive success on 9 October. Reliefs had taken place and in some parts of the front areas 1,000m wide had 17 heavy machine-guns and large numbers of Maxim MG 08/15 machine guns distributed among the infantry companies. The tempo of British operations was causing considerable anxiety among German commanders.
Battle
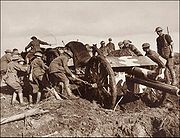
The 3rd Australian and the New Zealand divisions relieved 66th and 49th divisions on the night of 10 – 11 October. Their patrols discovered that 49th Division had got on the spur east of the Ravebeek and that the 66th Division was still near its start line. The state of the ground was dreadful and dead and wounded lay all around being sniped at by the Germans. The opening barrage line planned for the 3rd Australian Division was moved back 350 yards but this would still require them to quickly advance for 500 yards to reach it. The New Zealand Division CRA reported that getting artillery over the Steenbeek was extremely difficult and that gun platforms for the ones available were unreliable. Information about this and the barbed wire obstacle in front of the pill-boxes on Wallemolen spur took long time to reach Second Army HQ. Rain on 10 and 11 October held up the building of plank roads so field artillery couldn't be moved forward. Attempts to destroy the German positions on the spur were delayed until late afternoon of 11 October and had little effect. Since duckboard tracks had been extended to the line held on 9 October, infantry managed to move up for the attack on the night of 11 October, despite rain and a German gas bombardment of Gravenstafel spur. Wind and heavy rain began about zero hour 5.25 a.m. and lasted all day.The first and second objectives were those intended for the morning and the final objective was much the same as that intended for the afternoon of 9 October. 3rd Australian Division was to advance just beyond Passchendaele with its left to the north of Goudberg and the New Zealand Division was to capture the Wallemolen spur. On the New Zealand front the creeping barrage was very thin and diminished as it moved forward, with howitzer shells burying themselves in the wet ground and exploding harmlessly. The infantry tried to cut their way through the uncut wire on the spur and had heavy losses (2,735 casualties) to German machine-gun fire. The same fire stopped the left of 3rd Australian Division at the first objective south of the Ravebeek. On the right it reached the second objective and a patrol got into Passchendaele, finding it empty. At 10.50 a.m. the Australian reserve battalion was sent towards the west of the village to combine with another New Zealand attack at 3.00 p.m. Before this could be done the Australians withdrew slowly in the face of the machine-gun fire from the Bellevue pill-boxes, sniping and artillery fire so the attempt was cancelled. On the right the 12th Brigade, 4th Australian Division got across the Keiberg spur but withdrew with the 3rd Australian Division.
Flank protection for the main attack by 9th and 18th divisions XVIII Corps, Fifth Army, attacking north of Goudberg and north of the Lekkerboterbeek, broke down amidst ineffectual artillery fire, mud and machine-gun fire from drier undamaged German positions in front of Flandern I. XIV Corps on the left managed to advance closer to Houthoulst forest under much better artillery and machine-gun covering fire. 4th Division was held on the right near Poelcappelle but on the left advanced 700 yards to the final objective. 17th Division captured most of its final objective astride the Ypres – Staden railway and the Guards Division all of its objectives by crossing the Vijwegen spur and closing up to Houthoulst forest.
Aftermath
The deterioration of the weather again on 4 October had hampered British operations at a time when the German defence was severely shaken. In his diary for 12 October Rupprecht wrote,- Witterungsumschlag. Erfreulicherweise Regen, unser wirksamter Bundesgenosse. ("Break in the weather. Welcome rain, our strongest ally".)
having begun preparations for a withdrawal on 7 October.
The weaker artillery support and increase in mud had made it much easier for the defenders to separate British infantry from their creeping bombardments and hardly any counter-battery fire was achieved between 9 and 12 October. On 13 October it was decided to stop attacks until better weather allowed roads and tracks behind the British front to be repaired so that artillery support could return to the levels of September.
The British assault failed to achieve any of its ground objectives and resulted in significant Allied and German casualties. The German 195th Division, guarding the approaches to Passchendaele had such heavy losses that it had to be relieved. The only benefit apart from the casualties inflicted on the Germans was that the marginal territorial gain did provide a slightly better starting line for the Second Battle of Passchendaele. The Canadian Corps relieved the II Anzac Corps
II Anzac Corps
The II ANZAC Corps was an Australian and New Zealand First World War army corps formed in Egypt in February 1916 as part of the reorganization of the Australian Imperial Force following the evacuation of Gallipoli in November 1915, under the command of William Birdwood...
on 18 October from its position along the valley between Gravenstafel Ridge and the heights at Passchendaele. After a period of preparation, the Canadian Corps continued the Allied advance, ultimately capturing Passchendaele on 6 November.
Two Victoria Crosses, the highest military decoration for valour awarded to British and Commonwealth
Commonwealth of Nations
The Commonwealth of Nations, normally referred to as the Commonwealth and formerly known as the British Commonwealth, is an intergovernmental organisation of fifty-four independent member states...
forces, were awarded for actions during the battle:
- PrivatePrivate (rank)A Private is a soldier of the lowest military rank .In modern military parlance, 'Private' is shortened to 'Pte' in the United Kingdom and other Commonwealth countries and to 'Pvt.' in the United States.Notably both Sir Fitzroy MacLean and Enoch Powell are examples of, rare, rapid career...
Albert HaltonAlbert HaltonAlbert Halton VC was an English recipient of the Victoria Cross, the highest and most prestigious award for gallantry in the face of the enemy that can be awarded to British and Commonwealth forces.-Details:...
of the 1st Battalion, King's Own (Royal Lancaster Regiment). - Captain Clarence Smith JeffriesClarence Smith JeffriesClarence Smith Jeffries VC was an Australian recipient of the Victoria Cross, the highest decoration for gallantry "in the face of the enemy" that can be awarded to members of the British and Commonwealth armed forces...
of the 34th Australian Battalion.
The New Zealand Memorial to the Missing at Tyne Cot commemorates New Zealanders who were killed during the Battle of Broodseinde and the First Battle of Passchendaele and whose final resting place is unknown.